 |
|
|
previous topic :: next topic |
| Author |
Message |
Matt V
Since 26 Oct 2014
463 Posts
Summer- OR Coast, Winter - My van near good snow
Explosive Diarrhea
|
 Sun Mar 20, 16 6:45 pm KiteFish Quad Mod Sun Mar 20, 16 6:45 pm KiteFish Quad Mod |
 |
|
KiteFish Quad Mod
As promised, and though about 6 months later than I had hoped, here is my KiteFish Quad Mod specs and tricks to complete this mod (see following posts). This is the only board/configuration that I use now after selling my twin-tips and my real kitesurfboards such as the 2012 North Whip, and Slingshot Coupe and quad-mod Coupe. Please keep in mind that I weigh somewhere around 100kg. Thus all my evaluations and opinions come from a heavyweight strapped kitesurfers point of view. Strapped may be a big part of my positive experience with this mod. However, other lighter weight kiteboarders that have ridden my KFQM boards whom also own a standard tri-finned KiteFish, do seem to indicate they like the feel and are impressed with the upwind improvement of the quad vs tri configuration. (EDIT! My own testing in 2016 has contradicted my prior assumptions of better upwind capability with quad fins. Stock fins in stock locations (tri-fin) actually gave me slightly better upwind performance) So I think that you too could possibly benefit from this modification. Again, strapped could be a huge part of my positive experience. Also of note is that I am using Slingshot Canted Side Surf Fins that I purchased out of the Slingshot sale section of their website. These are the red and white with a Slingshot logo and can occasionally be found at Second Wind on consignment. They seem to be similar in shape to the 2014 green Liquid Force fins. But the shape of the Slingshot fins are a dead ringer for the 2015 Liquid Force fins that came with the FoilFish. Please note that the red Slingshot fins typically are mis-matched (so too are the stock green 2014 LF fins). I do not know how Slingshot had these fins made, but they are pretty far out of tolerance for a typical packaged pair. One will inevitably have different placement on the screw holes, rake, base length, total area, or height. My solution to this (considering they started at something like $8.00 a pair and are now $3.80 a pair) was to just buy a bunch so I could sort and match them. Needless to say, I have lots of these and just give them away when I wear them down enough to notice a performance issue. If you ever meet up with me at the beach, ask and I may have a pair for you that you need to fill with a bit of epoxy, take some time with a file, and have a free set of these.
Here is the back story of my experience with this board:
I first purchased a used (2011? red board) KiteFish in February of 2013. Immediately after getting it home from the snowkite meet I picked it up on the way to, I set about turning it into a quad fin setup. I used the wrong epoxy at first as it was pretty brittle stuff. But now I use West System G/flex 650 with some 404 High Density filler. This G/flex epoxy will not crack as easily so it is perfect for a reinforcement pour from top sheet to bottom sheet. I converted the board to a quad before ever riding it tri because I never have had a positive experience on a tri-finned board. My first quad finned board that I purchased before this one was what kept me from giving up kiting in favor of windsurfing. So for me, directional quad finned kite boards changed my path in the wind. The layout that I give technical section is a fin placement take off of my favorite quad finned board ever, the 5-8 2012 North Whip. I took the Norths measurements and modified them to fit the KiteFish. I often describe my North Whip as having an epileptic feel to it. On my Whip, before I even get the thought through my head turn the board now the board seems to have already turned and I am just trying to get back over the top of it. I love this instant+ or precognitive feeling. My hope was that just by putting the same number of fins on the bottom of my Kitefish, I would get the same feeling as my North Whip. THAT DIDNT HAPPEN!
Actually, I hated my KFQM (KiteFishQuadMod) board at first. Even with the quad-mod, it seemed to not go upwind as well as my Cabrinha Plasma twin-tip board. It was also heavy as a brick compared to my North Whip, felt like it had a higher weight than even ancient tri-finned boards that I had used, and was not poppy or snappy. The lesson learned after some research into what was the problem? Bottom shape is key and much more important than the fin number or even placement.
At this point, I thought I had wasted my money on this board and the KFQM went to the bottom of the pile under my twin-tips which were under my real kitesurfboards. I did try to use the KFQM in light winds when I just could not stand to be on a twin-tip. I even learned double back rolls and front rolls on the KFQM because I took it out in marginal conditions with nothing better to do than try a new trick while having to loop the kite for power. But the KFQM just did not excite me when the wind picked up enough to be on my North Whip or Slingshot Coupes.
Coming back to the KFQM was inevitable, even though my initial experience of directional riding was on nicer/snappier real kitesurfboards. Back in 2012, I was getting hooked on riding my nice surfboards in 5 of water with 4 of fin under the board. I liked to ride my twin-tips in these conditions too. Why do I like to ride in super shallow water? Because I was always hooked on waves even if the only wave I could get was a 12inch lake shorebreak wave in Nebraska. While this is not immediately detrimental in the soft blow sand of Lake McConaughy or Calamus Reservoir in Nebraska, it became a problem in the concrete hard surf-pound sand of the Oregon coast. Can we say broken fin boxes in a week? Yup, we can and did. So there I was in 2014 on the Oregon coast, with 3 trashed out Kitesurfboards that I could not fix easily myself while living out of a van. What happened next was the redemption of apparent failure and seemingly misplaced hopes for my KFQM.
As I pulled out the KFQM to hit Manzanita, I thought This is going to suck, but at least I am kiting! For those of you that do not know, Manzo has some pretty brutal and quick waves that just seem to appear out of nowhere from everywhere. In fact, most kiters avoid Manzanita because the waves are junk. So my first experience on the ocean with the KFQM did suck, at least for the first few days. The inside was pretty sweet with the KFQM being a wide board, but the quick waves were a bit more of a challenge. The wide fish tail of the Kitefish is an obvious problem on vertical faces. But after a few days, I learned to kind of cut the board in half and use one of the fish tail points as a single point on vertical stuff. I am not saying that was actually happening as I do not often look down and back while on an overhead wave, but the feeling of the KFQM was becoming more natural.
Of greater note is the upwind and high wind capabilities of this board. If you see me at Ft. Stevens, I am typically on a 1.5m kite smaller than your average weight (170lbs) rider there. I also have 50lbs on them, and do not do downwinders. My quiver for water kites does not go bigger than 13.5m and I never intend to. So it would seem that the KFQM board is a decent light wind board for me. Still, for getting upwind quick in tight areas, my old Cabrinha Plasma was way better. But what about KFQM board in high winds? One would think that this board would be too wide to manage in 30knts. Not for me! In high winds, I believe the extra weight of the board seems to keep it more stable on the water through chop. Also, with a slight V in the board continuing through the tail (not supposed to be a good mix with a quad?) it seems to stay calm and not be too harsh for a wide board when kiting in 30knots of wind. Quad fins also help at top speed since the board can go in a direction other than where it is pointing. I must admit that the new straight outlined surfboards did give me a run for my money on upwind capability this year. One Canadian sporting a 2015 North Whip (definetly a new straight outlined board) was besting me upwind at Ft. Stevens in 2015.
But now for the most important part of the story
One would think that after wrecking 3 boards, I would be a bit more careful riding inside to not go to shallow. If you come to that logical conclusion, you would be wrong. I mean, if I did not get the hint on the 3rd wrecked surfboard, why would I get it on the 4th and last working surfboard. It must be a nervous tick or some sort of OCD thing for me, but I kept riding in too shallow and taking the same entrance as the tide was going down. Inevitably, I hit bottom and went flying over the handle bars. Not just once, but multiple times. For the first 10 times of getting a face full beach, I picked up the board expecting to see the fins broken off. NOPE! Still there! All 4 of em! No cracks in the board!
2 seasons later, with lots of time on the Oregon coast and in the shallows of the sandhills reservoirs of Nebraska well
.I have replaced some fins
.BECAUSE THEY WORE DOWN, NOT BECAUSE THEY BROKE! EVER! Not one the five KiteFish boards I use have ever had any fin or modified finbox breakage. And that is with my 220lbs grinding them down in the sand while screaming into the beach. Just to push it a bit, sometimes I come to a complete stop in less than a foot of water, and just sink the board to the bottom while in the straps - standing there long enough for the board to vacuum down to the bottom then stepping off to see it pop up some time later. Seriously, do you know of any other fin/board that can take that kind of beating? I weight 220lbs and ride shallow. Not typically a good way to keep your gear in good shape. But this board has held up.
So the Liquid Force Kitefish is the board for me. It does everything I could ever want. I even have my hydrofoil mounted on one of mine with the holes for the quad setup ready to put fins on should I ever need to. For my kiteboarding future, I really only see riding the KFQM. I have lost most interest in all other directional boards and twin tips have passed out of my fancy a long time ago. So I hope you get something out of the technical info I am providing. But please stay safe and dont ride in shallow like me. One day I know my number will be up but I cannot help it. Shallow KFQM riding is just my disorder. Maybe I will stop when I break an ankle again.
Here is Pepi's old post about him doing the same on a KiteFish
http://www.nwkite.com/forums/t-30236.html&highlight=kitefish
_________________
MSN has temporarily removed commenting on our websites while we explore better ways for you to engage in discussion on the issues you care about.
Last edited by Matt V on Mon Feb 19, 18 8:23 am; edited 4 times in total |
|
|
Matt V
Since 26 Oct 2014
463 Posts
Summer- OR Coast, Winter - My van near good snow
Explosive Diarrhea
|
| Sun Mar 20, 16 6:46 pm Quad Mod Specs and Fins |
|
|
Q11Kitefish Quad Mod Technical Specifications
Here are my current procedures and the techniques I just used on my most recent mod of 2 new in box Liquid Force KiteFish boards and a re-mod of my original (used) KiteFish from 2012ish. In the following procedures, I will detail how I performed my modifications. I am also detailing my specifications for fin placement. Please note that I have not extensively experimented with different fin locations or other types of fins. The following pictures are the most recent project with a focus on attempting to keep the center fin location, thus allowing me to experiment with 3 or 5 fin configurations on this board. I am also attempting to induce some cant to the fins with precise fin location and a guide block for setting the angle of the hole. For the counter sink, I have turned some custom made guided hand countersinks to counter sink on a precise angle when on the slope of the top sheet close to the rail of the board.
Fin Specs
The Slingshot Canted Side Surf Fins that I have used exclusively up until this point, have never broken on me. They do wear down in the sand when you run them too shallow (when they hit hard sand, stopping the board, and you go over the handle bars), but they have NEVER broken on me. So I happily put up with the some flaws in them.
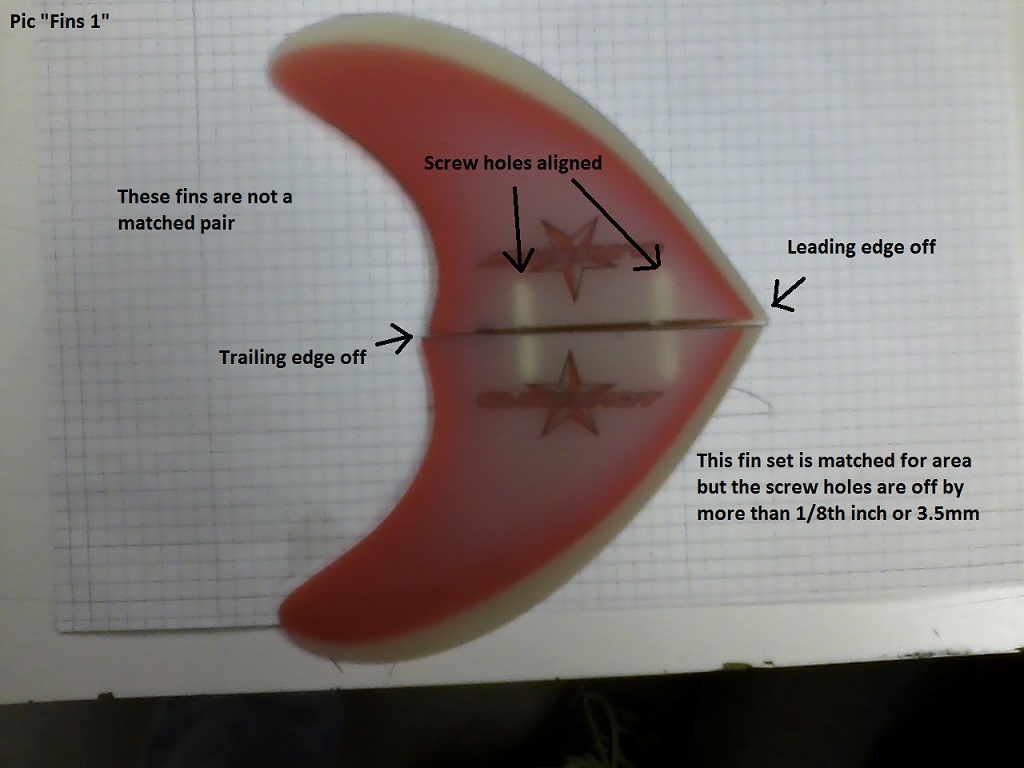
The overall flaw is that they are not even close to matching each other in a packaged pair. From my experience of sorting 80+ of these fin sets, about 6 originally packaged pairs have been acceptably close in dimensions for me to put them on opposite sides of the board. As for front and back sets, I do not care about difference in shape other than I try to get the biggest (most area) set placed in front and the smallest placed in back. This difference is possibly significant to non-existent depending on luck of the draw from my box of now hand sorted fins. My suggestion is for you to get a few extra sets so you can make somewhat matched pairs. Given a large enough quantity to sort through, you can make matched sets of various grades and quality. I mark my sorted sets as Matched Pair, Matched 2nd, Matched 3rd, and unmatched.
Matched pairs are nearly indistinguishably mirror images of the opposite fin in the pair. But they may have cosmetic differences in where the red color stops and the white starts.
Matched 2nds will have at least one and possibly 2 non matching characteristics. This could be a leading edge that is 1/16th different from the opposite fin but all other edges line up with less than 1/16th difference.
Matched Matched 3rds are still usable but could be off in leading edge (for example) placement by up to 1/8th AND not have the same trailing edge AND/OR area or height. But these are still seem usable and not detrimental (in my opinion) to everyday riding.
Unmatches sets, which I have had up to 4 sets at a time (when I owned only 40 sets), do not get used as their total number is small enough that and the cost was low enough to ignore. I keep them on hand in case one fin ever does break. In that case, I am hoping that I will have broken its twin and can use that unmatched fin as a replacement (mute point when I have never broken a fin). At 80+ of these fin sets, I now only have 1 set of unmatched fins.
Another criteria that I passively observe and grade accordingly, is the maximum thickness. This can be difficult to match due to the variability in the fin outline and the different shapes that exist in these fins at any one cross section. Specifically, the base of the fin can have some irregularities, such as a concave on the topside that fades away as you move just ¼ up the fin.
Rarely, the screw holes in the fin can also be slightly off in distance on center. But reaming the holes in the board usually takes care of that issue. However, on my most recent build out of my 2 new KiteFishes and a re-build of my original KiteFish, I located the holes a bit more precisely. Using a lathe type center drill to start the holes on the bottom of the board, I can locate my holes with the highest degree of precision without magnification. With a though hole cant jig (predrilled block that can be set at an angle) and a guided countersink, I believe that I can control angle to a precision where I will no longer want to ream the holes to fit a fin that is off in hole location. If I do ream to account for the rare fin with holes slightly off, it may affect the cant of the installed fin.
The main advantage to using the Slingshot Canted Side Surf Fins is that they have a 1 ½ distance on center. This means that the hole pattern is the same as the Liquid Force Kitefish factory hole pattern. Although I do not really need to grind out and pour epoxy for the front fin location, doing so does provide some advantages. With bomber poured fin screw support, I eliminate the fin from crushing the board bottom, I make the system stronger and eliminate flex, and precisely locate the front fin holes with accuracy much greater than factory. Factory holes in the board vary from side to side and also are not the same from board to board.
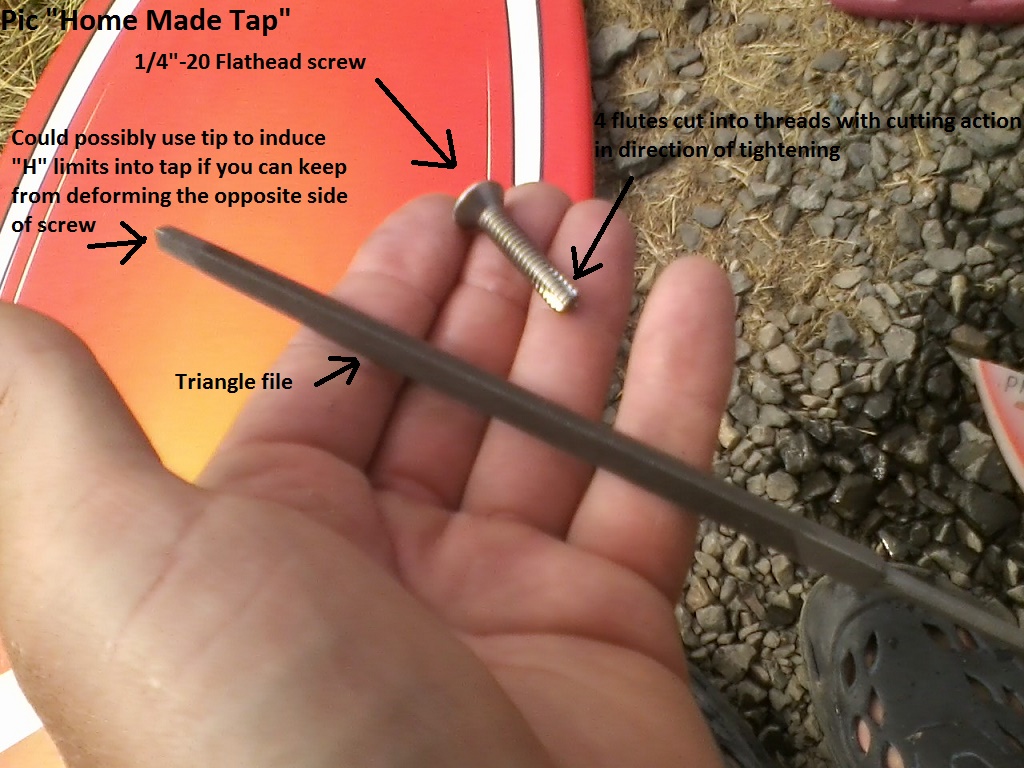
Another problem with these fins is that occasionally you will find a fin on which one of the holes did not get tapped completely to the bottom. This would indicate by the screw not going in all the way. The easy remedy is to buy a bottoming tap in ¼-20 size. Make sure you get a bottoming tap as plug and taper are useless for this application (unless there are no threads at all). Bottoming taps are somewhat a specialty tap that may not be available in a hardware store. Once you get a bottoming tap, simply tap the hole. I have occasionally made my own taps with a small triangle file and a ¼-20 screw. (See Pic "Home Made Tap" below.) If you watch your angle so you get 3 (or 4) sharp edges in the direction of tightening, these homemade taps can cut out those remaining threads in the bottom of the hole. However, given that there are no H limits on a homemade tap, you will still have a very difficult time screwing in the fastener as the threads will be very tight. A bottoming tap is a much better choice. If you are really good with a small hammer, have a triangle piece of key stock, you can induce some H limit in the homemade tap. If you do not understand what I am talking about by H limits, just buy a bottoming tap. They are available at Englunds Marine. And this bottoming tap is also useful for 2015 stock LF Kitefish/Foilfish fins as I have seen some of them needing to be tapped also.
One should also understand that these fins, and the 2015 LF stock fins (along with the 2014s) do not align the toe in of the fin with the holes. So your holes will be drilled along a line with less toe in than you will get from the fin once it is installed on the board. In contrast, twin tip fin (50/50 symetrical) holes are aligned as well as standard surf fins with boxes FCS, Furures, and even Mini-Tuttle. So please take this into account when setting toe in angle, should you choose to use a different angle than specified here. The Board 5 and Board 2 (Figure FL) layout drawings have the fins installed on the hole layout (Figure HL), but you will see that the drawing of the fins installed has significantly more toe in with the Slingshot Canted Side Surf Fins than just the holes themselves. But if you choose to use a symmetrical twin-tip fin (good ones are Slingshot 2.5 Reform/Scud Fin Pack), I would recommend you use the same toe in as I do or more. To get the same toe-in with twin-tip fins installed, you would need more toe-in on the holes. This is just given as an example and you may want to just make your holes parallel to the center line of the board (and eliminate added toe-in) as 50/50 fins are not believed to benefit from toe in as much as 70/30, 80/20, or Flat (100/0) asymmetrical fin foils.
Please note that these Slingshot Canted Side Surf Fins are unique as they have an inside shape to them as well as being classified as flat and almost 70/30 depending on where you take a cross section. On these, the tip is more flat, mid is 80/20, low is inside, and bottom is almost a reflexed wing trailing edge. Basically, I will just say good luck in guessing how these will ride for you until you actually ride them given their complicated design. My impression is that they feel just a bit taller than their actual height. Some of this may be due to the thicker base section necessary to encompass the large ¼-20 fin screws.
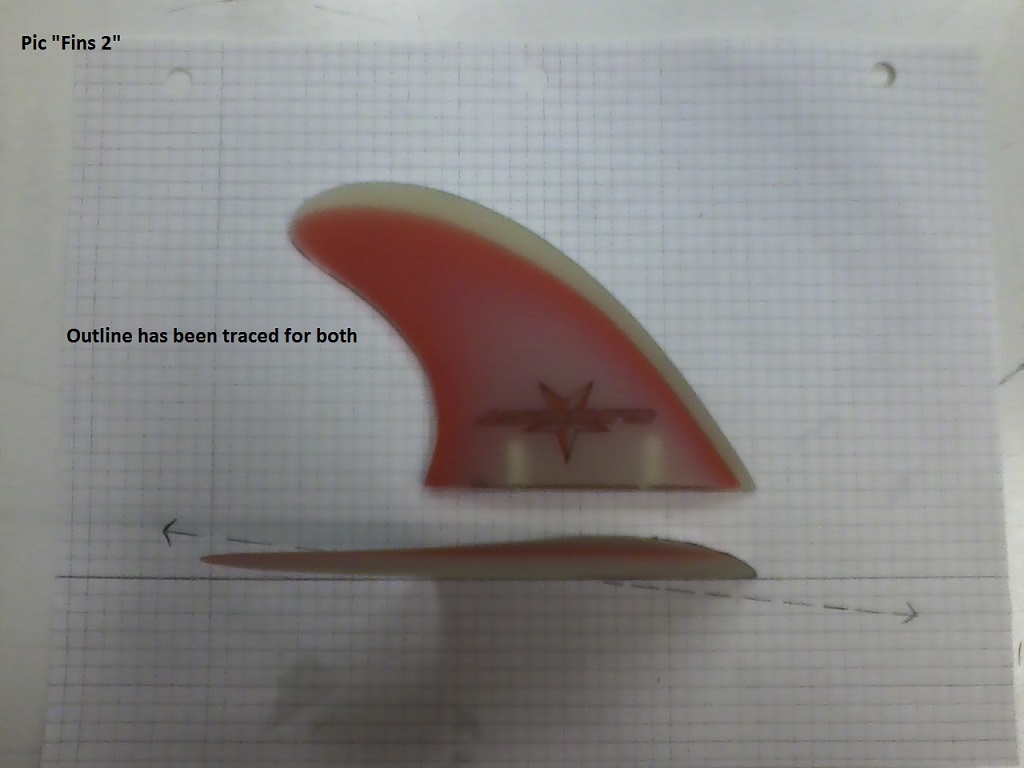
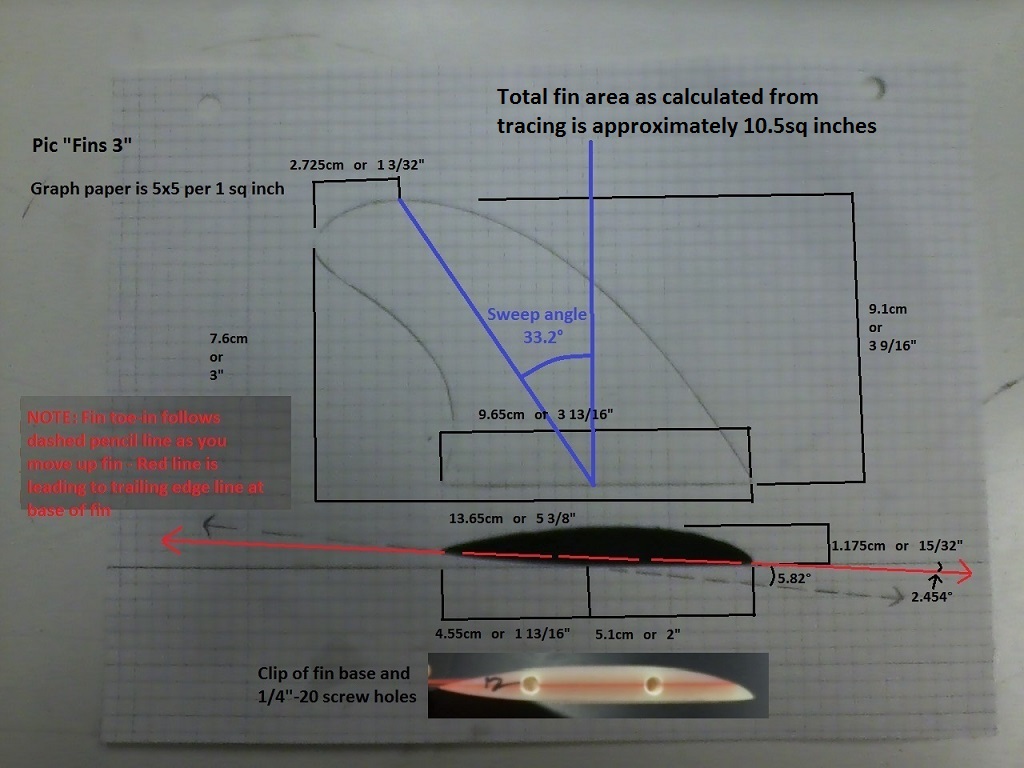
Here are some fin dimensions of the Slingshot Canted Side Surf Fins.
Please note that these fins vary quite a bit and this is only a randomly selected one that seems to be on the large and thick side.
 |
| |
Fins1.jpg |
 |
| |
Fins2.jpg |
 |
| |
Fins3a.jpg |
 |
| |
HMTapXXX.jpg |
_________________
MSN has temporarily removed commenting on our websites while we explore better ways for you to engage in discussion on the issues you care about.
Last edited by Matt V on Wed Mar 23, 16 6:44 am; edited 3 times in total |
|
|
Matt V
Since 26 Oct 2014
463 Posts
Summer- OR Coast, Winter - My van near good snow
Explosive Diarrhea
|
| Sun Mar 20, 16 6:46 pm Measurement and Layout of holes |
|
|
Measurement & Layout (Slingshot Canted Side Surf Fin hole placement)
For marking and measurement tools, I use:
.3mm mechanical pencil (a .5mm would work too) with stock or softer lead as hard will etch the board
2 aluminum yardsticks
18 thin steel ruler with cm/mm as well as inches (I take off the cork backing to get more accuracy)
Square
2 wide masking tape
To start the layout process, you need to find the center line of the board. Do not rely on the existing factory holes in the board as a way to locate the center line. I have found every board I have modified had discrepancies between starboard and port as well as differences between individual boards hole locations (on different boards). One could complain about LFs quality control on this, but I am just happy they have a board for cheap that I can make indestructible. If LF actually did what I do to these boards, it would cost double.
I typically begin with my best guess at the nose and center of the fish tail cutout. Of the many mods I have done on these boards, I have not had one fish tail cutout be perfectly aligned with the centerline. There must be some hand finishing that the factory does on this area. So this first measurement at the rear is more of a guess. To draw my first guess at centerline, I push the 2 alumnium yard sticks together to span the length of the board and mark it based on these 2 guessed points. Masking tape can help if you do not have anyone to help you while you hold the 2 yardsticks down to the rocker of the board. Masking tape is also valuable when marking on a dark bottomed board like the FoilFish or the black portions of the previous model.
This first guess at a line may be enough for you, but I get a bit more detailed. I then start to square off of this line and the rails. I mark a few centerline points and inevitably wind up moving the centerline a few mm from my first guess. I typically spend a few hours on this layout process, and even redo all the measurements if I am more than 1/2mm off. I do this because I am not really looking for center line, but rather distance off of the rails. Thus if I would measure out from of a center line that is off, one fin would be much closer to the rails than the other side. So having a precise centerline as a starting point is the best way to even up the board, though the distance from the rails should overrule in the case of any discrepancy.
Once the center is found, then you can begin to measure from the tail up to the front hole locations. I measure distance from the very end of the board (fish tail tips) forward. I do this by placing a ruler (or piece of angle iron) across the edge of the fish tail tips, then measuring along the center line up. For the front fin FRONT HOLES, the measurement is 14 ½. For the back fin FRONT HOLES, it is 9 1/8. I then mark these measurements on the center line. With the square on the center line, I mark a line crossing the board out to the rail. Then, with the 18 ruler with mms on it, I mark out from the centerline. For the front fins FRONT HOLE, this measurement is 18.3cm out from center line. For the back fins, the back fin FRONT HOLE measurement is 12.6cm out from centerline. This completes the location of the FRONT HOLES for the front and rear fins. And sorry for going between Metric and Standard. It is just a symptom of convience for close markings on rullers. On inch marked rullers, 32nds are only marked in the first inch which makes it kind of a PITA.
To locate the REAR HOLES on the front and rear fins, you simply measure down along the centerline of the board 1 ½ past your initial front hole centerline mark. Using the square again, you measure over to the rail again and draw a line. If you want no toe-in with respect to hole location, you would use the same measurements out from the center line. I prefer to induce a bit of toe-in by putting the front fin BACK HOLES out 1.5mm further outboard than the front holes. This brings this measurement to 18.45cm from the centerline. For the back fins, I only put the BACK HOLES 1.0mm further out than the front holes. This brings the back measurement on the back holes to 12.7cm. The toe-in on the holes is thus 1.5° for the REAR HOLES and 2.6° for the FRONT HOLES. THIS IS NOT the toe-in for the fins as the Slingshot Canted Side Surf Fins would have toe-in if located even on holes located on a line parallel to the center line. Thus the toe-in for the fins on these holes is even greater when the fins are actually installed on this layout. Figure HL is of the actual hole placement that I use.
 |
| |
Meas1.jpg |
 |
| |
Meas2.jpg |
 |
| |
Meas3.jpg |
 |
| |
Meas4.jpg |
 |
| |
BoardHoles1.png |
_________________
MSN has temporarily removed commenting on our websites while we explore better ways for you to engage in discussion on the issues you care about.
Last edited by Matt V on Mon Mar 21, 16 5:48 pm; edited 3 times in total |
|
|
Matt V
Since 26 Oct 2014
463 Posts
Summer- OR Coast, Winter - My van near good snow
Explosive Diarrhea
|
| Sun Mar 20, 16 6:47 pm Layout of Slingshot "Canted Side Surf Fins" |
|
|
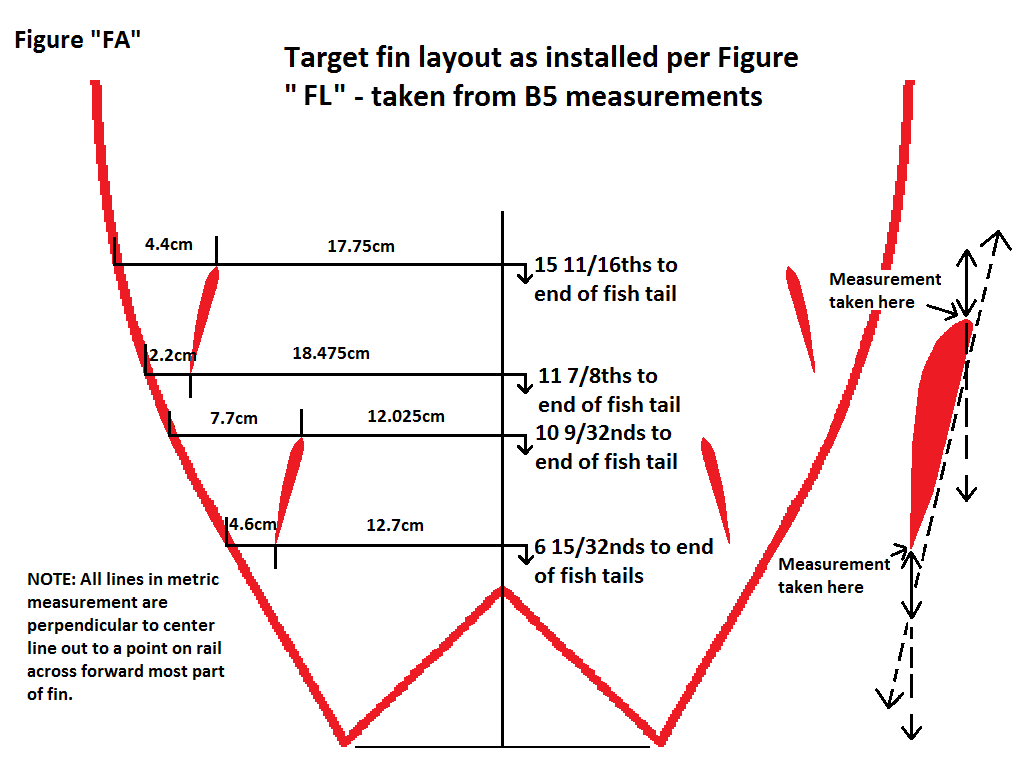
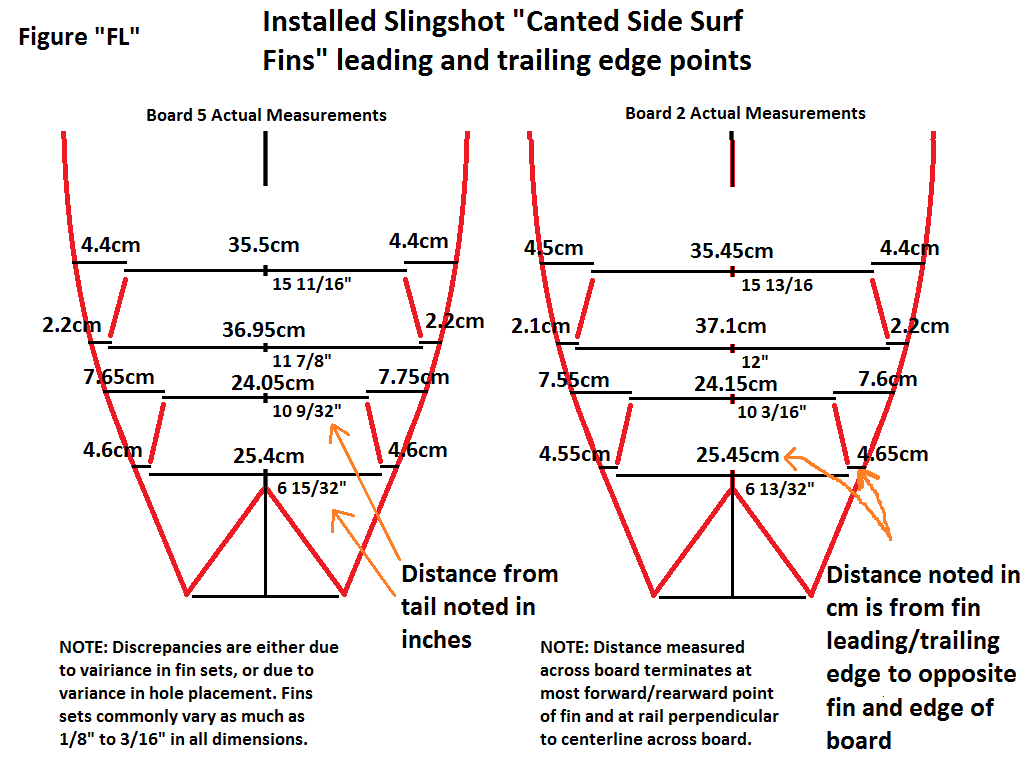
Layout of Slingshot Canted Side Surf Fins
Here are the measurements of the Slingshot Canted Side Surf Fins when installed on the previous hole pattern. See Figure FL. This shows the additional amount of toe-in given the hole locations AND the shape of the fin/fin holes.
Unfortunately, I cannot give any idea on the point of convergence of these fins at this particular toe-in angle in front of the board. I tried and it was maddening. I seriously popped a vein in my forehead and finally quit.
First, the fins are not perfectly matched so that throws you way off. And even if you just pick one side, you still have to deal with the fact the the fins inner (underside of the wing) portion points at different angles as you move up or down the fin. On top of that, it is impossible to even try to get an average angle at the fin base since the trailing edge to leading edge line is INSIDE the fin and then somewhere pops out when you go up the fin far enough. MADDENING! Getting a grip on these fins is like trying to understand 4 or more dimensions of geometry. Maybe they are from the 4th dimension? But who cares since they work and work better than longer fins.
For the pics, please note that some measurements are slightly off which is most likely due to fin variance. Other possibilities could include inaccurate drilling of holes or inaccurate measurement.
 |
| |
BoardBase1VertFinsAVER.png |
 |
| |
BoardBase1FL2and5.png |
_________________
MSN has temporarily removed commenting on our websites while we explore better ways for you to engage in discussion on the issues you care about.
Last edited by Matt V on Wed Mar 23, 16 6:21 am; edited 5 times in total |
|
|
Matt V
Since 26 Oct 2014
463 Posts
Summer- OR Coast, Winter - My van near good snow
Explosive Diarrhea
|
| Sun Mar 20, 16 6:47 pm Die Grinding the Cavities |
|
|
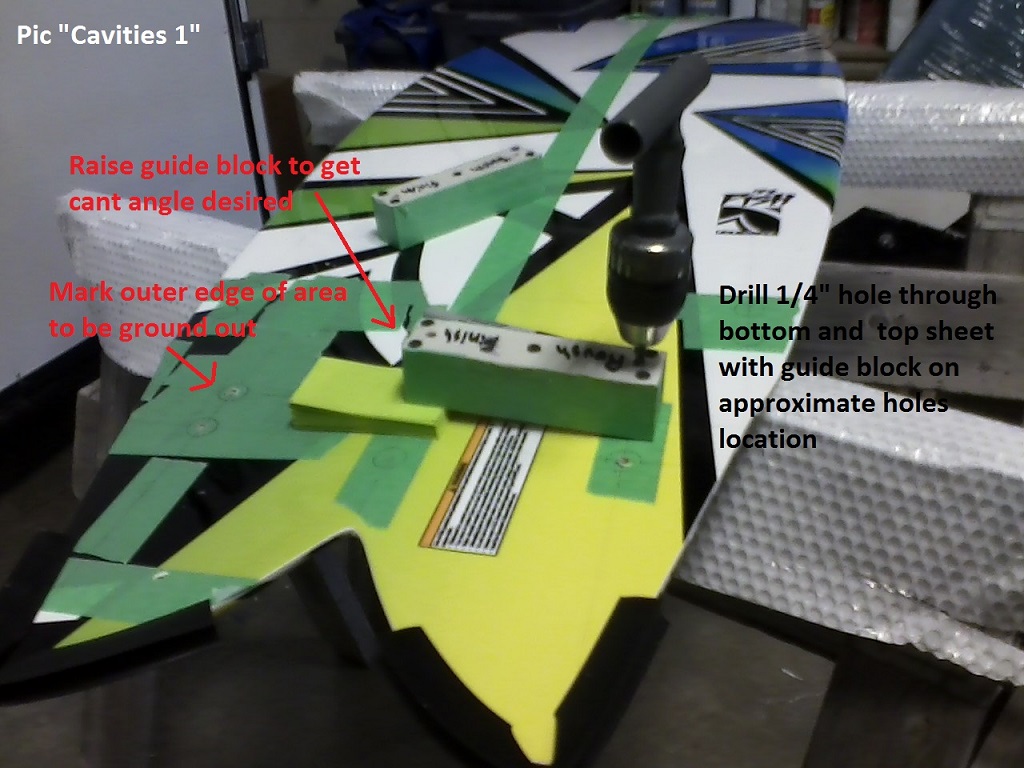
Die grinding
For the grinding of the cavities, I use the following tools:
Goggles and a face shield (last trip to the emergency room to have something pulled out of my eye cost me the price of 2 good used kites so put goggles on now while you are reading this and take them off once you are done with the project)
Dust mask or better yet, respirator
Small washer or dime(for bottom)
Large washer or quarter (for top)
Sharpie or pen
Masking tape
¼ drill bit and drill
OPTIONAL: rough drill angle guide such as a plastic/wood block with a perpendicular hole drilled through on a drill press
¼ die grinder (Dremmel on steroids) with a carbide Christmas tree bit
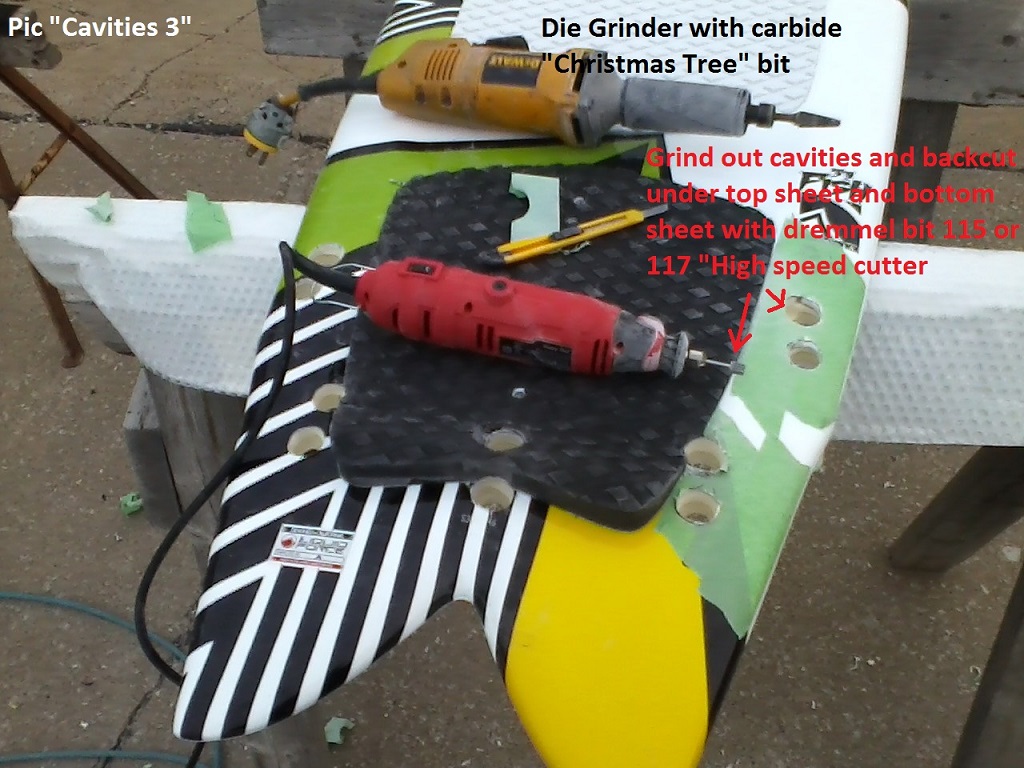
Dremmel tool with 115 or 117 high speed cutter
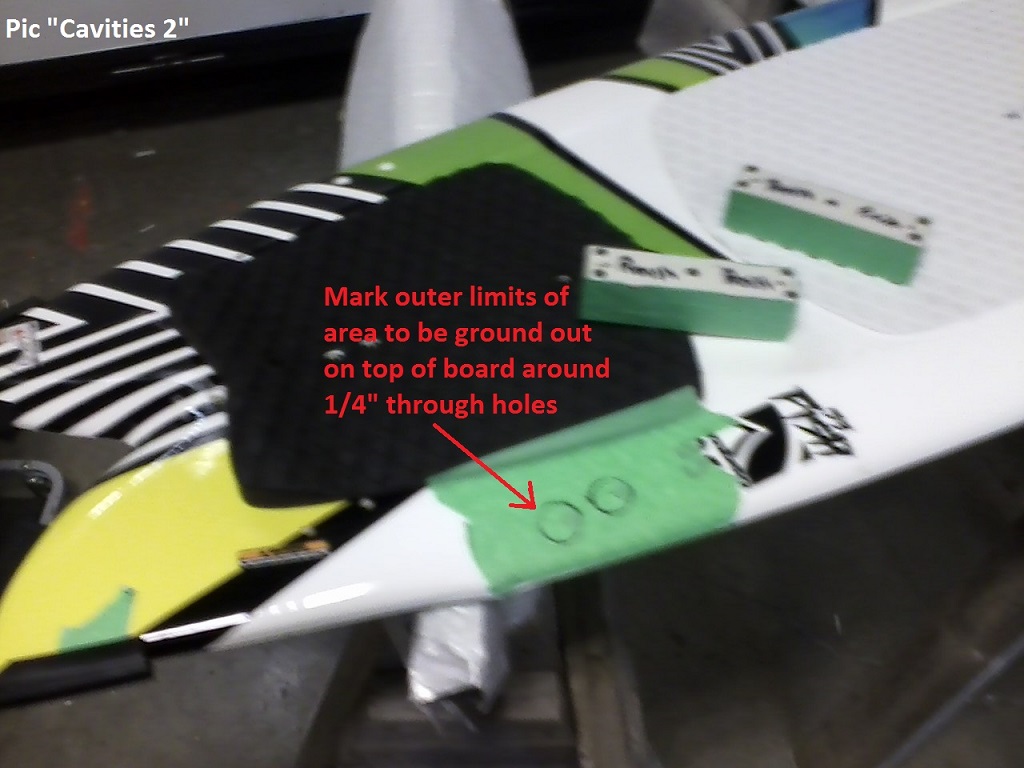
I do not drill (with a drill bit) these boards through fiberglass shell other than to start a pilot hole of ¼. If you use any larger than a ¼ drill bit, you will TEAR the fiberglass shell and induce some cracking. This is not as bad as it sounds as the board is so tough; you may never notice a crack in the fiberglass top or bottom sheet. And given the Liquid Force core foams resistance to water (factory holes are not even sealed), you really do not need to worry about it as much as I do. But for me, I like to use a die grinder to make the hole/cavity to pour full of epoxy. Though I have not experimented with it, a grit tipped hole saw may work as well. But I prefer to have the top hole larger than the bottom because the countersunk head of the screw needs more room than the exit hole of the screws shaft. The countersunk hole in the epoxy winds up being ½ and the screw shaft hole is only ¼. So I die grind out the holes instead of drill both the top sheet and bottom sheet. This does not produce perfectly round hole, but it does protect the top/bottom fiberglass sheets from cracking.
I start by marking the holes to be made. Using a round object such as a washer or dime, draw a easily visible dark line with a sharpie or pen on the bottom of the board to mark the extents of where you want to grind. If you use a washer (open in the center) as opposed to a coin you can more easily center the mark around the center point of the layout measurements. Place the dime or small washer on the bottom of the board over your hole locations. Then trace the outline of your dime or washer making sure to have a dark enough mark to easily see while die grinding. Sharpie permanent marker will come off with rubbing alcohol later if you wish.
Then I drill with the ¼ bit and a cordless drill. Here you can use a plastic block to assure the proper angle of the hole to the bottom of the board. On these boards in the pictures, I am experimenting with different cant angles and make the hole angled by jacking up one end of the drill guide block. With business cards, I can make any angle I want given measured thickness of a number of cards with a caliper and an internet triangle calculator. I will let you figure that out yourself. But previous to these boards being converted, I just used 90 and did not induce any cant into the holes.
With the holes drilled through the bottom and top of the board, you can now use the quarter or big washer to mark the top of the board with the extent of your grinding area. After the marking, I place a few layers of masking tape around the top and bottom areas of the board that I could accidentally touch with the die grinder. It is not much protection, but it is something.
Then, I die grind out the holes to the extent of the washer marks. Be careful to keep the grinder straight up and down. You will also encounter the factory screw head plastic re-enforcement on the top of the board at the original front fin hole locations. This will take some more patients to grind through, but I always remove it. Again, you could skip this step and just use the front holes as they were laid out in the factory. Maybe it is just me, but I prefer my .5mm of accuracy to the factories close enough attitude. Another reason to skip doing the front holes is that you will use less epoxy and spend tons less time on this project.
Once I have fairly good holes with the die grinder, it is time to move on to the Dremmel. With the 115 or 117 tip, you can back cut up under the lip of the hole that you just made with the die grinder. I really like to remove all of the foam that is bonded to the fiberglass top sheet and bottom sheet. This will give you additional cavity for the epoxy to set in and will lock the epoxy plug in place. This lip really makes this a forever modification. Remember, you want to get the underside of the top sheet down to the fiber glass. This may be serious over kill for fins, but when using the same process to install some foil mounting holes in the center of the board, I would definetly back cut the top and bottom sheet to eliminate the possibility of pulling out the poured core.
 |
| |
Cavi1.jpg |
 |
| |
Cavi2.jpg |
 |
| |
Cavi3.jpg |
 |
| |
Cavi4.jpg |
_________________
MSN has temporarily removed commenting on our websites while we explore better ways for you to engage in discussion on the issues you care about.
Last edited by Matt V on Sun Mar 20, 16 7:04 pm; edited 1 time in total |
|
|
Matt V
Since 26 Oct 2014
463 Posts
Summer- OR Coast, Winter - My van near good snow
Explosive Diarrhea
|
| Sun Mar 20, 16 6:48 pm Epoxy Fill with G/flex |
|
|
Epoxy Fill with G-Flex
If you have never worked with large quantities of epoxy, you are in for a mess. I use the following tools:
G/flex liquid 650 (West System) DO NOT USE 655 AS IT WILL NOT FLOW
West System 404 High Density Filler
Graduated measuring cups (available at paint or automotive paint stores)
Mixing sticks
Large needle or wire for poking air bubbles
10-15 pairs of latex gloves
Newspaper
Masking tape
Razor knife or Exacto knife
The red board in the pictures is my first KiteFish that I modified this way. I used West System 105 epoxy to fill the holes and it served me well for a long time. But there were 2 minor cracks on one of the fin hole fills. This may be due to the 105 being much more brittle, or it could have been a flaw in my pour. Either way, I think G/flex is the better epoxy for this application for 3 reasons.
First, G/flex does just that FLEX. It is not as brittle as other epoxies so it is much more resistant to cracking. In a high load situation with torque and shock, G/flex is my choice in epoxies. The only other choice would be polyurethane.
Second, G/flex does not seem heat up as much as even slow epoxy (West System 105 with slow hardener). I have melted some foam cores on surfboards before when making too massive of a pour using West System 105 resin with 206 slow hardener. But G/flex just never seems to get hot to the touch, though it can get a bit warm. The trade off is that G/flex takes a long time to set up.
Third, G/flex does not care about water! You can actually apply this stuff underwater. Look it up, it is manufacture certified for this. 105 cannot even have moisture near it before it cures. Polyurethane is completely allergic to water. Only G/flex can be poured on a wet board. (I would appreciate correction if I am wrong about any type of polyurethane which could be used in a wet application)
The one thing that I DO NOT like about G/flex is that it is poor in abrasion wear. I have used it to fill in fin dings in the past but the G/flex just wears down in one session. West System 105 or even MarineTex would be my choice for filling in dings and cracks subject to abrasion wear where a fine tolerance is to be maintained.
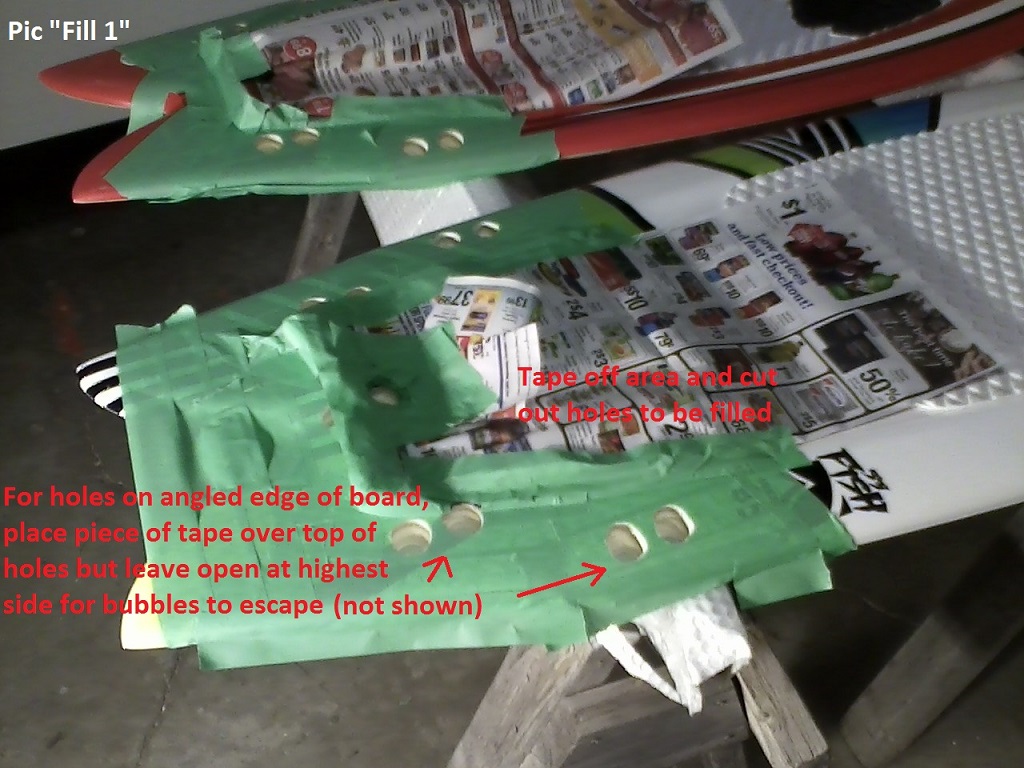
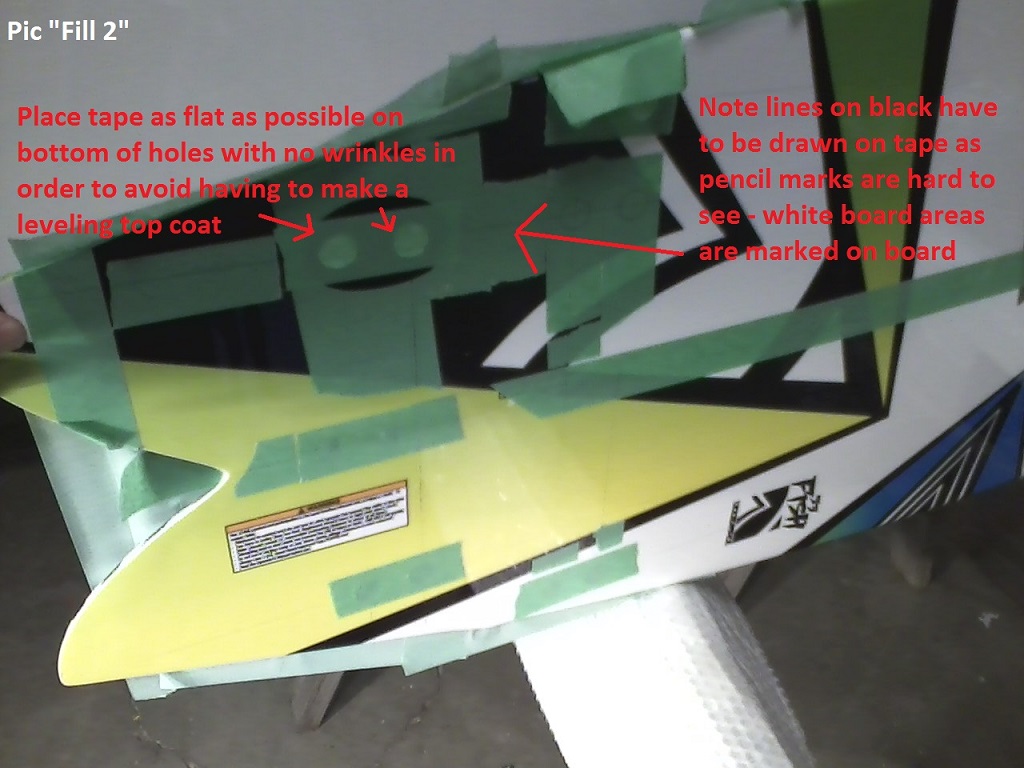
To prep the cavities you just made in the die grinding step, put some wide masking tape over the top and bottom, then carefully cut out holes in the tape with a small razor knife leaving the tape portion on the board intact. Then tape off the rest of the area. And I mean the whole back end of the board. G/flex is messy and gooey like honey. It will get on everything. On the bottom of the board, you just put a piece of masking tape to serve as a stop and form the new bottom of the board where you ground out. I then place the board on a level set of saw horses. But some of the surfaces that have to be filled are angled on the edge of the board. To stop the G/flex from running down the side and not filling the cavities level, I place a piece of tape ready to lay down on the side of the board. I do not cover up the hole completely, but I do get close. There is a small gap on the highest side of the hole when this extra piece of tape is laid down to let out any air bubbles.
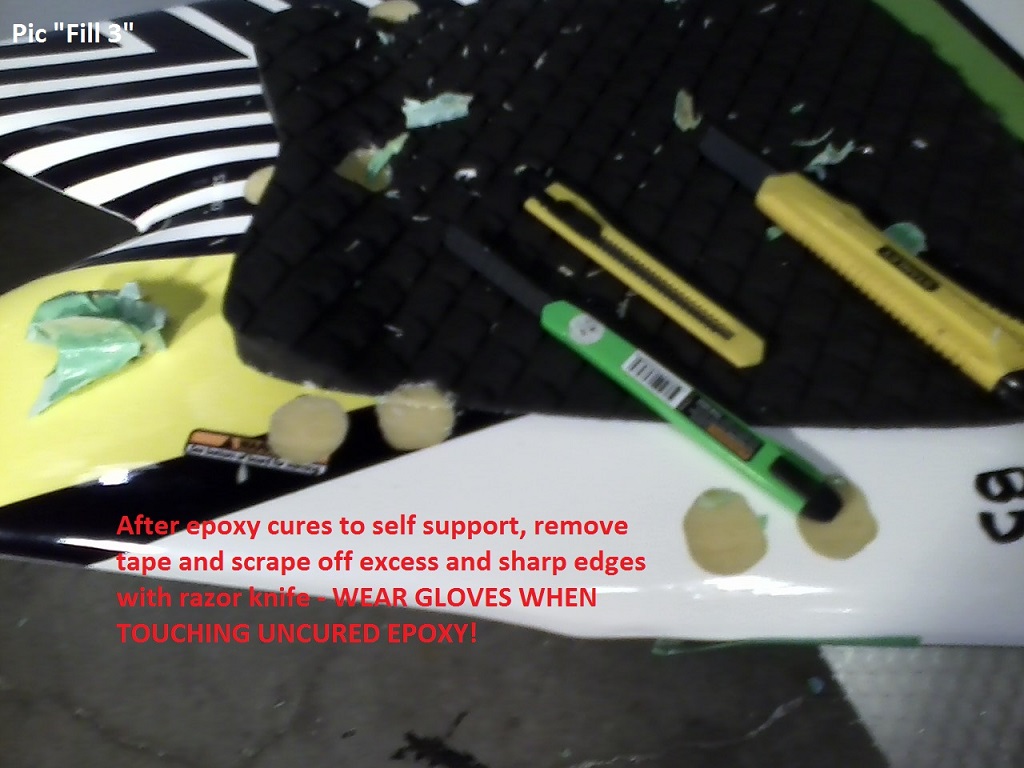
I prefer to allow the G/Flex to cure for 24-48 hours. Sometimes I do finish early with a razorblade when the epoxy is still somewhat soft. This makes cutting down high spots a bit easier. I also prefer to use rubber gloves when the epoxy is in this state as it will still have some uncured catalyst in it. This catalyst is the toxic part of the otherwise benign epoxy material. Make sure you read the warnings on any epoxy and understand the risks of using it.
After the initial cure of the pour, I check to see that the bottom surface is level with the bottom of the board. Given the location of the center holes on the bottom of the board at the peak of the V I inevitably wind up pasting a coating of G/flex on them to match up the bottom surface of the board. Since this constitutes mixing epoxy again, I take the opportunity to (grind, then) fill any large air bubbles that were trapped in the pour on top.
 |
| |
Fill1.jpg |
 |
| |
Fill2.jpg |
 |
| |
Fill3.jpg |
 |
| |
Fill4.jpg |
_________________
MSN has temporarily removed commenting on our websites while we explore better ways for you to engage in discussion on the issues you care about.
Last edited by Matt V on Sun Mar 20, 16 7:06 pm; edited 1 time in total |
|
|
Matt V
Since 26 Oct 2014
463 Posts
Summer- OR Coast, Winter - My van near good snow
Explosive Diarrhea
|
| Sun Mar 20, 16 6:49 pm Drilling and Countersinking |
|
|
Drilling & Counter Sinking
The tools I use are now fairly specialized and mostly homemade. On my first 2 modifications, I used less sophisticated and specialized equipment. You would not have to get as specific as I do, but it would allow greater precision and a smaller chance of having to ream holes to fit the fins. The tools I used in this latest build are as follows:
Measurement equipment as laid out in Measurement and Layout section
Lathe (center drill)
Standard ¼ 118° drill bit (not split point)
High end ¼ 135 drill bit (split point)
Home made hand drill made from an old cordless drill chuck and welded handle
Cordless/corded drill (not needed if you are modifying only one board)
Guide block drilled on a trued up drill press or mill
Homemade guided 82° counter sink (any regular ½ non-guided countersink will work if not overly concerned about fin cant) will also require a lathe and bench grinder to make
Guide block drilled on a trued up drill press or milling machine
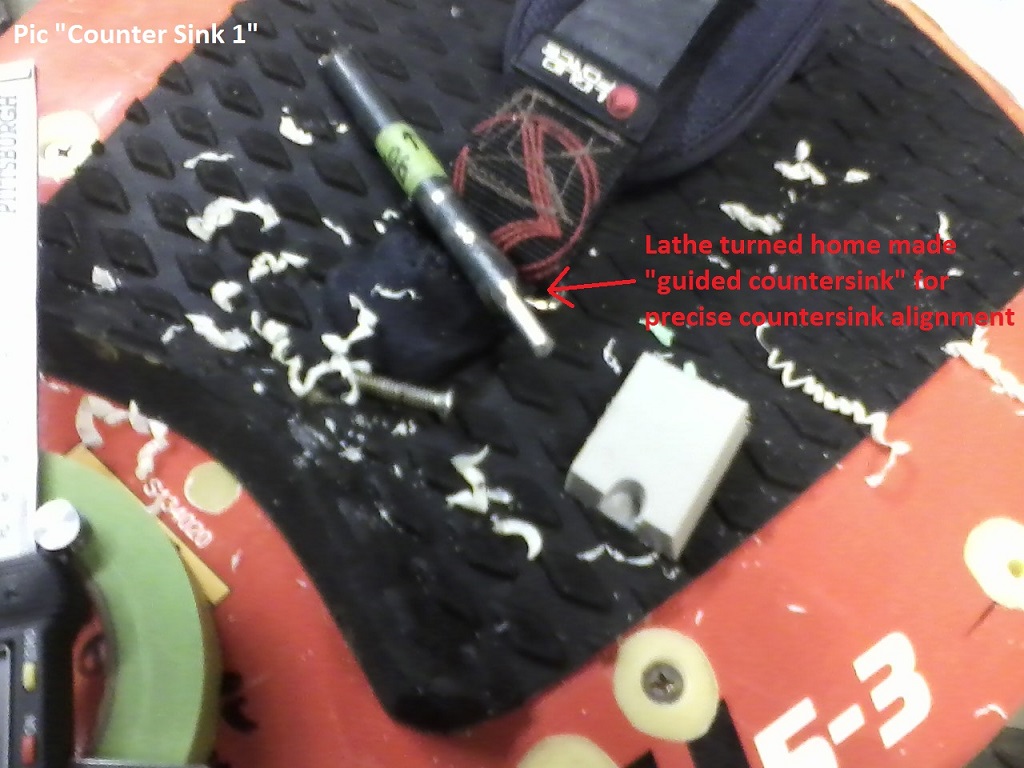
Once the Epoxy is cured and the surface is finished, I re-locate my holes with the lines on the bottom of the board (on the pour) and double check the measurements. This is the last chance to make sure I have everything right without having to fill holes again. Using a lathe center drill in a homemade hand drill, I precisely locate the pilot hole on the bottom of board on my measurements. Then I use a small lathe center drill to start my holes. I do not go any deeper than needed to fit the 118° ¼ drill bit tip. The tip of this bit has a small flat spot that helps it guide down a pilot hole and not cut wherever it contacts the material being drilled. This allows me to precisely locate a hole approximately 1/16 deep to guide the 135° split point drill bit. I built a few perpendicular guide blocks made of 3 pieces of ½ plastic screwed together and flat sanded on the bottom. I drilled the perpendicular hole on a milling machine to get the angle exactly perpendicular to the bottom surface. I place the guide block over my hole that I started with the 118° bit. I can then set the cant angle by raising up the side of the block at the center of the board.
To choose an angle, I looked up a triangle calculator on the web and used the trial and error method to come up with height to raise the angle block to give me a certain angle. Given that not many board builders use more than 6° of cant on fin sets, I chose to stick around a maximum of 5.5°. Your measurements will vary depending on what dimensions your guide block is. Then I used business cards to raise the end closest to the centerline. Given that the V of the board bottom already gives a .8-1°cant angle (what you would have if you just matched 90° to the bottom of the board at the hole location), I back off 1°. Thus a triangle yielding 4.5° produces a hole at 5.5°.
Since the 135° split point drill bit cuts with greater ease than the 118° non-split point bit, I use it to hand drill anytime I am guided by a started hole and a guide. I then drill from the bottom of the board to the top. Once the holes are all drilled, I move on to countersinking.
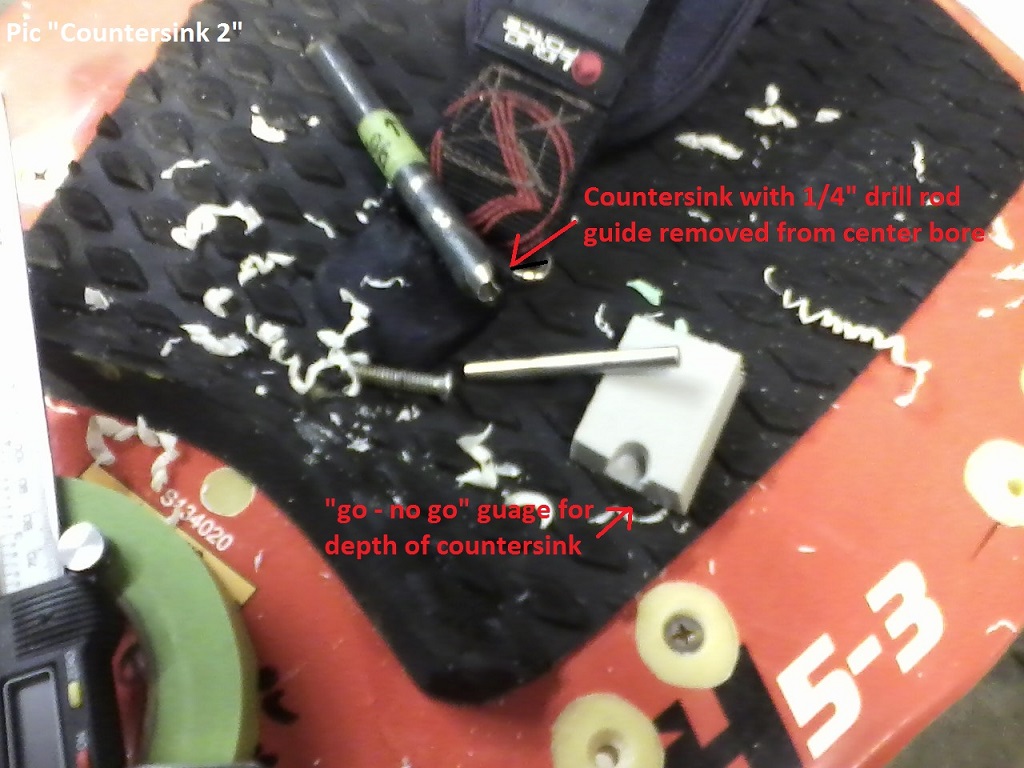
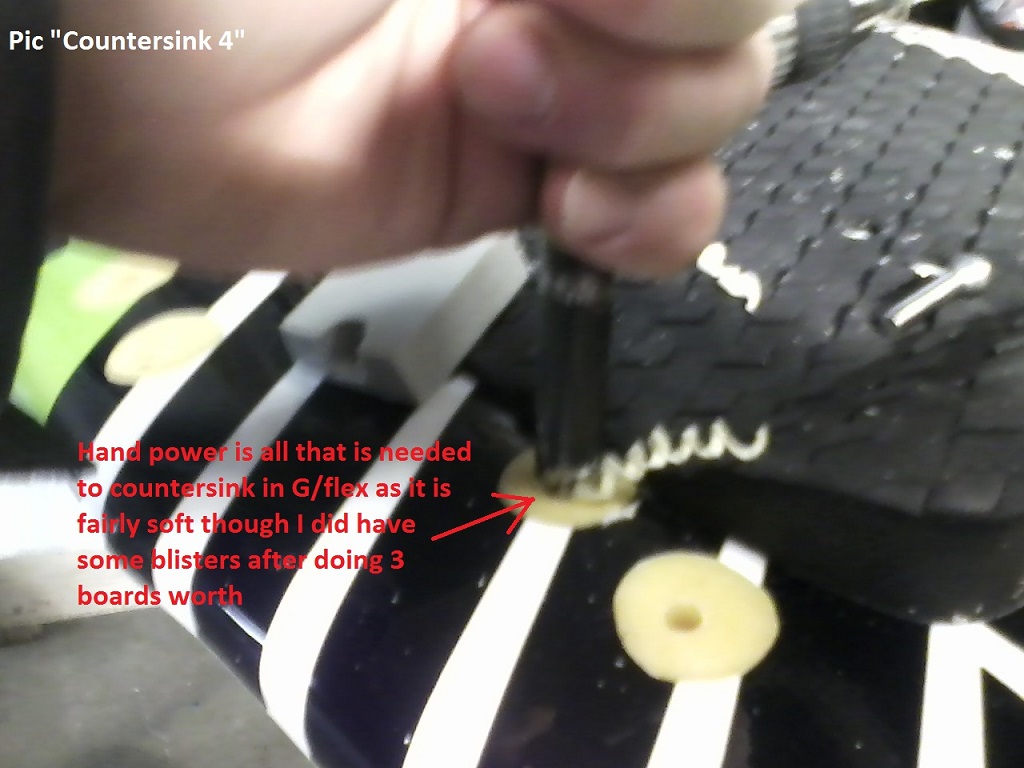
This countersinking operation is actually part of the fin fitting process. Your counter sink depth will control the protrusion of the screw out of the bottom of the board. IF YOU GO TO FAR, YOU MAY HAVE TO FILL AGAIN AN RE-DRILL! So take it slow and take care not to overdo it. One solution to over countersinking is to buy shorter screws. I use ¼-20 pan heads in 1-1/4 length. This is the same screw that Liquid Force used on their boards (not sure on the 2015). A 1 screw could save you from mixing epoxy again if you go to far. While I counter sink for these fins at all hole locations, the Slingshot 2.5inch Reform/Scud Fin Pack fins have a deeper hole that allows you to use a ¼-20 pan head in 1-1/2 length on the same depth of counter sink. So if you use that fin, then just counter sink to a depth that allows 1 ½ screws.
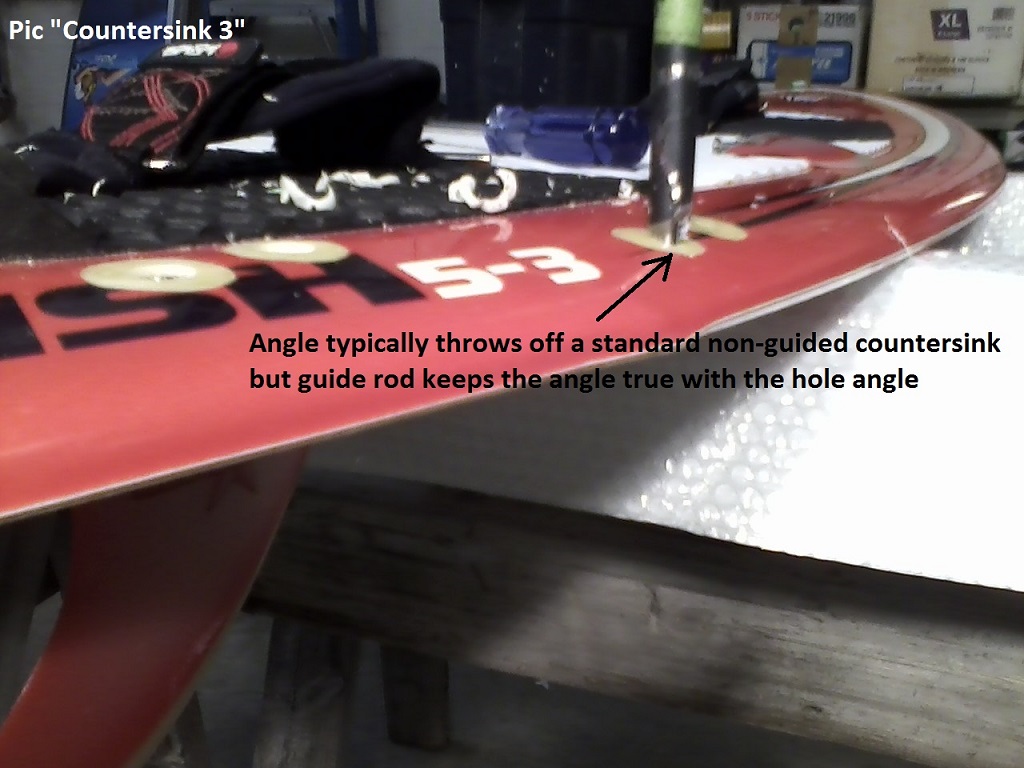
From the pictures, you can see that I made a specialized countersink for this operation. I did this because my previous builds had the standard countersink walking off to the side on the sloped surface at the edge of the board (on the front fins). I made these tools with the help of a lathe once I gave up on trying to get a centered hole in the ½ steel with a cordless drill. The piece of stock I used is ½ standard low carbon steel rod (non tool grade as it will just be cutting through cured epoxy). A ¼ hole is drilled in the center after the center drill makes a pilot hole. Depth of drilling is only around 1-1/2. This is enough to allow for future sharpening, if any. I then use a bench grinder and an electronic protractor to get a perfect 82° angle cone on the countersink. In my specific instance, I used a lathe to get the initial 82° cone on the end of the countersinks since I made a few extra. The same thing could be accomplished all on a bench grinder except the center ¼ hole in the rod. If you are making a countersink for the metric fasteners for the LF FoilFish foil mounting, you would need to make a 90° cone as metric flat head fasteners have a 90° angle on them. To get a cutting surface on the end of the counter sink, I simply ground them on a bench grinder at an angle. It did take a while to figure out at what orientation to the grinding wheel you need to go, but it is fairly easy once you get past that point. Then the relief angle is set similar to how you would sharpen a drill bit on a bench grinder. Then a piece of ground oil hardening drill rod is cut to a short length and inserted into the hole in the end of the countersink. This drill rod guides the countersink and holds it in line with the hole even when the countersink is cutting on the side of sloped surface. If the surface around the hole was flat and perpendicular to the hole, the guide would not be necessary. Given the foil is mounted in the center of the board, and that the board is held level while the pour is curing, the guide would not be needed to countersink for the mast base bolts. Also of note is that when built a non-guided countersink for the foil holes, I made it out of 5/8 steel to account for the increased diameter of the 8mm flat head screw. Remember that metric bolts/screws have a 90° angle to the head.
Over all, my time spent making the countersink has been worth it as the fins do show more consistency in the cant angle. The ½ guided counter sink has been a tool worth the hassle of making it.
 |
| |
Count1.jpg |
 |
| |
Count2.jpg |
 |
| |
Count3.jpg |
 |
| |
Count4.jpg |
_________________
MSN has temporarily removed commenting on our websites while we explore better ways for you to engage in discussion on the issues you care about.
Last edited by Matt V on Sun Mar 20, 16 7:09 pm; edited 1 time in total |
|
|
Matt V
Since 26 Oct 2014
463 Posts
Summer- OR Coast, Winter - My van near good snow
Explosive Diarrhea
|
| Sun Mar 20, 16 6:49 pm Installing Fins |
|
|
Installing the Fins
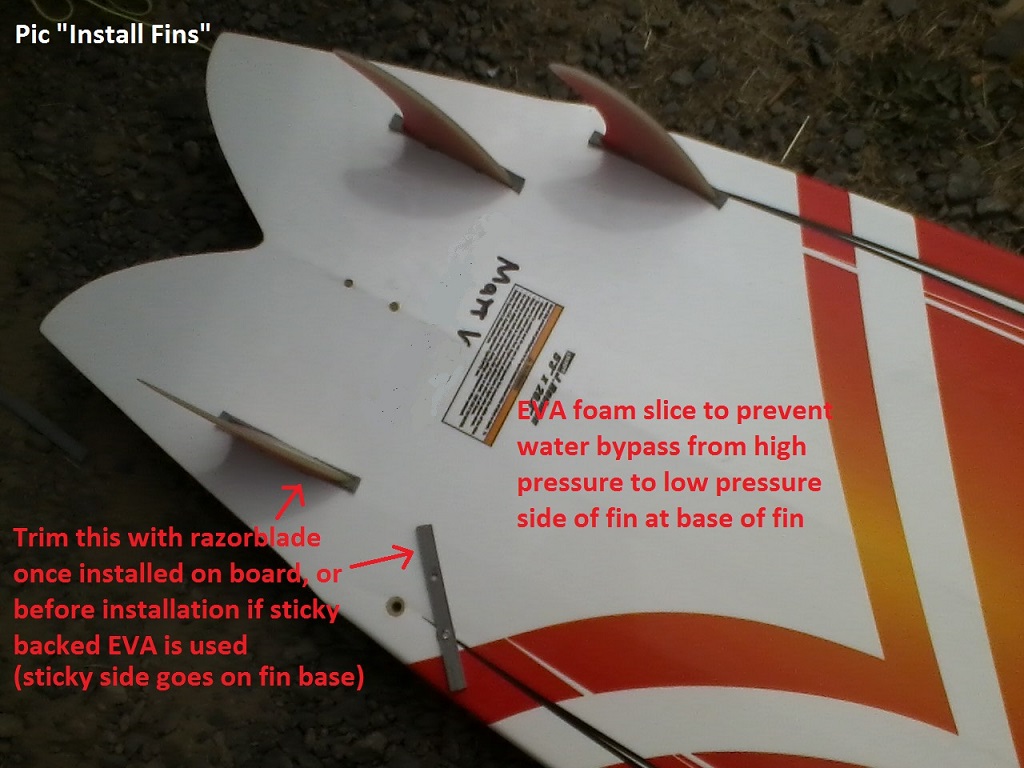
To install the fins, you simply use the ¼-20 fasteners to attach them to the board. If all of the holes in the fins are aligned things go smoothly at this point. If not, reaming the holes is how I have tackled the problem in the past. To be honest, I have not yet been able to realize any noticeable benefit from precisely located fin holes vs reamed out ones.
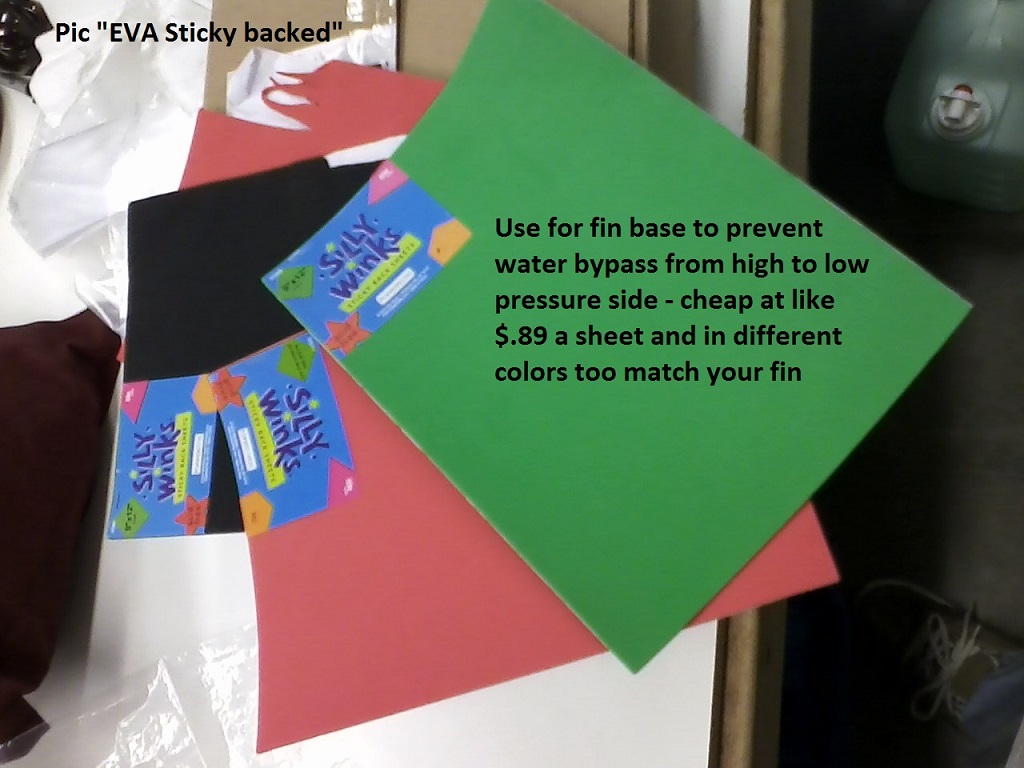
I have made one addition to this step to help with bypass of water from the high pressure side of the fin to the low pressure side. I install a piece of EVA foam at the base of the fin between the board and the fin. Since there is no fin box with fin base penetration into the board like in Futures fin box, some fluid flow likely happens from the top to the bottom of the board. This would tend to rob some of the lift from the fin. To stop this, I install a piece of EVA foam at the base of the fin between the board and the fin. While I have made my own sticky pads from 2 sided tape and some EVA slices cut with a razor knife, now I have a much easier way. Available at Hobby Lobby or other craft stores, Silly Winks adhesive backed EVA sheets is the perfect thickness and more convenient than cutting your own EVA. I think it is only liked 89cents a sheet and comes in different colors to match your fin. While many would debate the benefits of this small addition, I feel that it is worth the effort.
 |
| |
Inst1.jpg |
 |
| |
0316162309.jpg |
_________________
MSN has temporarily removed commenting on our websites while we explore better ways for you to engage in discussion on the issues you care about.
Last edited by Matt V on Sun Mar 20, 16 7:10 pm; edited 1 time in total |
|
|
Matt V
Since 26 Oct 2014
463 Posts
Summer- OR Coast, Winter - My van near good snow
Explosive Diarrhea
|
| Sun Mar 20, 16 6:49 pm Front Foot Pads |
|
|
Front Foot Pad
Given my use of this board in all wind conditions from light (& Hydrofoil) to 30+ knots, I have found that the stock front foot padding is less than adequate. Specifically, I find that my heel on the front foot will get a bit banged up on a high wind session in chop. To alleviate this, I install a 1/2 EVA foam pad only at the front foot position. This padding is cut down from Golds Gym interlocking workout flooring mat available at WalMart. I actually use this material to make butt pads for snowkiting also. Not the most glorious use, but an even more valuable use of this material than foot pads. It now costs around $25 for 6 sheets. Other uses for the unused sections of this material would be padding sharp corners or camping sleeping pad.
To glue the front padding down to the board, you can use 2 sided tape for temporary placement. Unfortunately, I have not had luck with 2 sided tape in a constantly immersed situations. The permanent way to glue this stuff down or together is to use Dap Contact Cement. Definitely follow the directions on this stuff as slapping together 2 pieces wet (not allowing to dry) will have disastrous consequences. You must put the contact cement on both pieces AND allow to dry before joining the pieces. Typical dry time is around 20minutes and will be visible as the gloss wet surface will have turned to more of a matte surface. And be warned, this stuff will stick with more strength than the EVA so you will not be able to reposition the pieces once they touch.
To remove an old pad for replacement, you must cut, scrape, and generally have a some time to kill. But it is possible and I have done it a few times. This Golds Gym interlocking workout flooring mat is pretty durable on top but it seems to be getting cheaper than the stuff I was buying in the same packaging a few years ago. The highest durability is from older mat that has a denser surface (from melting the surface texture onto it). You can visibly see this through the packing cellophane at the edges of the material. If you find some with this property, do not hesitate to buy it.
 |
| |
0321161328.jpg |
 |
| |
0321161328a.jpg |
 |
| |
0321161328b.jpg |
_________________
MSN has temporarily removed commenting on our websites while we explore better ways for you to engage in discussion on the issues you care about.
Last edited by Matt V on Mon Mar 21, 16 5:45 pm; edited 3 times in total |
|
|
Nak

Since 19 May 2005
4340 Posts
Camas
Site Lackey
CGKA Member
|
| Sun Mar 20, 16 7:10 pm |
|
|
Great post!!! Thanks tons! 
|
|
|
Wind Slither

Since 04 Mar 2005
2649 Posts
The 503
METAL
|
| Tue Mar 22, 16 6:58 pm |
|
|
If I read this whole post do I get some sort of certification or license?  
|
|
|
Matt V
Since 26 Oct 2014
463 Posts
Summer- OR Coast, Winter - My van near good snow
Explosive Diarrhea
|
| Wed Mar 23, 16 6:04 am |
|
|
You are not saying I am long winded are you? Probably a good thing I did not go into technical writing like I wanted to.
Playin around with 5 vs 4 fins now and have made some breakthroughs with my theories. Sometime this summer I hope to put out a detail of my experiences. Hopefully, I can do it at an early enough stage so as not to get as in-depth as this post - but yet have still some quantifiable and helpful info without getting that glazed over feeling/look from everyone else.
Feel free to make a condensed version if you like. You have my permission to republish anything here, though I give permission without making any claims or warranty as to effectiveness or safety.
_________________
MSN has temporarily removed commenting on our websites while we explore better ways for you to engage in discussion on the issues you care about. |
|
|
eabmoto
Since 10 May 2012
125 Posts
seattle
Stoked
|
| Wed Mar 23, 16 6:49 am |
|
|
| I turned my kite fish into a quad a few years ago, and rode it that way for a while. Then I tried just the back two fins and I liked it just as much or better. It locked in good but I could break it loose if I wanted. It also kept the weight down and made travel a little easier. It's a lot of work to screw all four fins in and out.
|
|
|
wylieflyote

Since 30 Jun 2006
1652 Posts
Puget Sound & Wa. Coast
XTreme Poster
|
| Thu Mar 24, 16 7:54 am |
|
|
| Matt V wrote: | | You are not saying I am long winded are you? Probably a good thing I did not go into technical writing like I wanted to. |

I got about 4 sentences into the read and asked myself "Isn't it easier to simply bring out a drill, punch 4 holes and mount the Foil Fish? Or StringyFoil?"
I'm so out of touch. OGing
_________________
CGKA Member
-------
Kip Wylie |
|
|
Matt V
Since 26 Oct 2014
463 Posts
Summer- OR Coast, Winter - My van near good snow
Explosive Diarrhea
|
| Thu Mar 24, 16 7:09 pm |
|
|
| Quote: | | "Isn't it easier to simply bring out a drill, punch 4 holes and mount the Foil Fish? |
I was hoping someone would help me out and do the condensed version without me having to put any more effort into it.
For condensing my 8,309 words down to
14 words
1 number
1 contraction
and 1 aquatic vertebrate
I give you my thanks.
Any chance you can post some pictures?
Tough crowd!
_________________
MSN has temporarily removed commenting on our websites while we explore better ways for you to engage in discussion on the issues you care about. |
|
|
Occupied Columbia
Since 12 Nov 2011
376 Posts
Columbia City
Obsessed
|
| Thu Mar 24, 16 7:55 pm |
|
|
| Bravo! I admire the dedication.
|
|
|
wylieflyote
Since 30 Jun 2006
1652 Posts
Puget Sound & Wa. Coast
XTreme Poster
|
| Fri Mar 25, 16 4:13 am |
|
|

In good spirit.
I drove 2 hours and dropped it off at Stringy's. Not mechanically (or verbally) skilled
_________________
CGKA Member
-------
Kip Wylie |
|
|
|
|
You cannot post new topics in this forum
You cannot reply to topics in this forum
You cannot edit your posts in this forum
You cannot delete your posts in this forum
You cannot vote in polls in this forum
You can attach files in this forum
You can download files in this forum
|
|

