 |
|
|
previous topic :: next topic |
| Author |
Message |
Nak

Since 19 May 2005
4340 Posts
Camas
Site Lackey
CGKA Member
|
 Fri Mar 30, 07 8:26 pm Modifying C kites with a KPO style bridle. Fri Mar 30, 07 8:26 pm Modifying C kites with a KPO style bridle. |
 |
|
There was a thread a while back about 04 Fuels. I wrote the following post"
Before I knew there was a KPO I was playing around with the idea. It works really well on my larger 04 fuels, so much so I'm going to try it on my smaller ones.
Benefits:
1. Turns faster with less bar input. It doesn't make the kite turn faster technically. But it does require less bar input and less bar pressure to turn the kite. The result is it feels like the kite turns faster. My 19 felt like a pig to me before, now its pretty decent for a big kite. Still a lot slower than smaller kites though...
2. Significantly less bar pressure. Like 70% - 80% less.
3. Handles gusts easier. You get more depower for the same bar movement. Total depower remains unchanged, you just need less bar movement to get it. the depower strap really just becomes a trim strap. Full depower is available just by moving the bar out. (NOT bow-like depower!!!)
4. Relaunch is easier. My feeling anyway.
CONS:
1. You have two pulleys on the kite.
2. DANGER. If you place the bridle wrong, the kite can power up completely with no way to control it!!! Steering can be lost in this situation. Placement of the bridle attachment points is CRITICAL!!!
The bridle is very simple. All it really is is one extra pigtail on the wingtip. Airtime can add this for pretty cheap. (I forget exactly how much it was.) the placement of that pigtail is what is critical. I'll post pics later, but the bridle is just one line (1/8" Amsteel) hooked to the front pigtail and the new pigtail, creating a "V". A pulley rides on that line. The front pigtail in turn is attached to the pulley. Rear attachment is unchanged, although you do need a long pigtail to make up for the length of the bridle. One bridle for each wingtip.
Once done, you really need to test it while it is hooked up to an immovable object, like a truck. (I didn't do it this way initially, not fun at all. I could have been killed.) Check that the kite still is controllable. Check that the kite powers and depowers with control bar movement. Check it in at least the highest winds you'll fly this kite.
Compared to new technology you might not be impressed. Compared to how the old kite flys before and after though...
Last is the new pigtail placement. There are a couple of ways to calculate this. If anyone is still interested I'll post pics of the mod and how to calculate the pigtail placement. If I've scared everyone off then no need!
DANGER: PLEASE REMEMBER! If you do not place the new pigtail properly, the kite WILL NOT be controllable!!!
Anyway, I've received some emails expressing interest in this, so here is some more info!
Nak
|
|
|
Nak
Since 19 May 2005
4340 Posts
Camas
Site Lackey
CGKA Member
|
| Fri Mar 30, 07 8:29 pm |
|
|
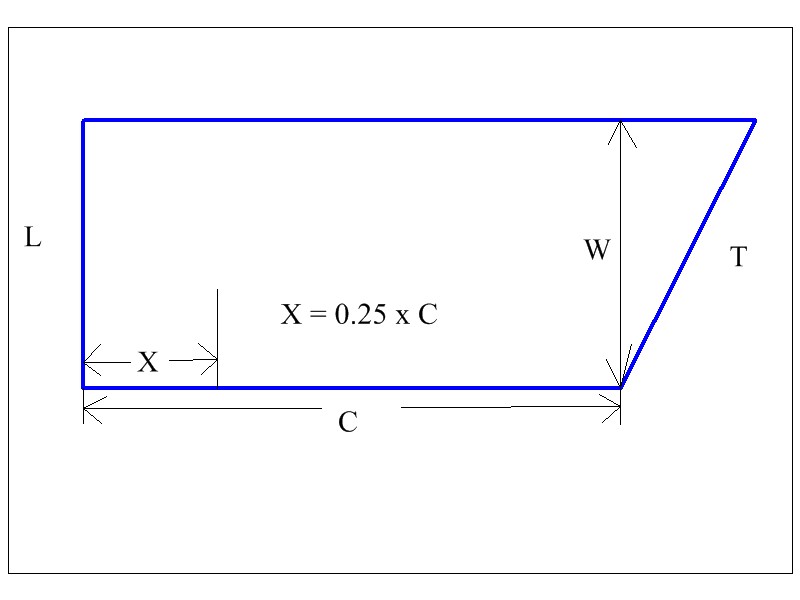
An approximation of center of lift can be calculated as follows. Please refer to the attached drawing 1.
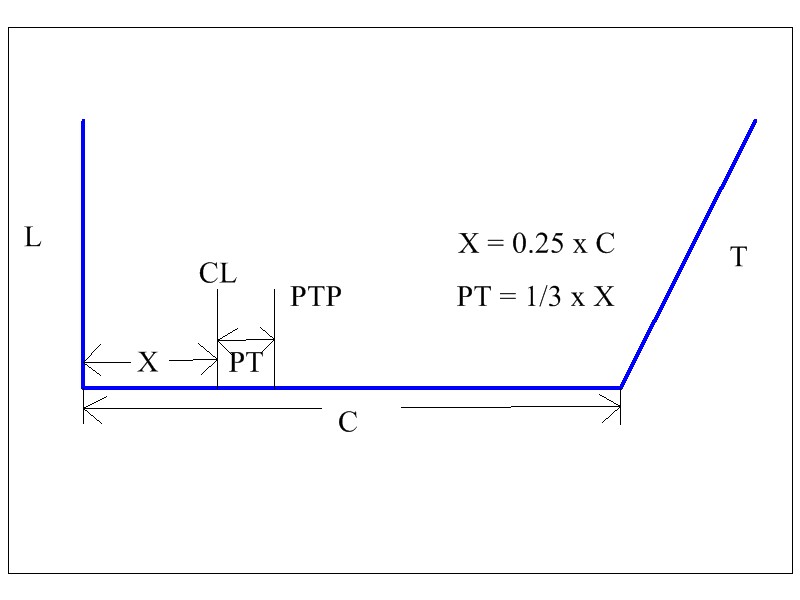
The heavy blue lines represent the wingtip of the kite. L is the leading edge and T is the trailing edge. The stock pigtails are normally located at either end of line C. Measure line C. Divide by four. That is the distance X from the leading edge back towards the center of lift, CL. The distance PT MUST BE NO MORE than 1/3(X). Line PTP indicates the pigtail placement position. The further aft PTP is, the lighter the bar pressure and the more effective the bridle will be. WARNING, if distance PT is greater than 1/3(X) the kite may go out of control at any time. When this happens the rear lines will go slack and you will have ABSOLUTELY no control of the kite. All steering and depower WILL BE LOST!!! You MUST test the kite while the chickenloop is attached to an immovable object before flying it yourself. Remember, mistakes can and will happen. Verify your pigtail placement is safe!!! Example: C = 40 inches. X = .25(40) = 10 inches PT = .33(10) = 3 inches. (Round down.) The pigtail will be placed 13 inches from the leading edge. (3 + 10)
What we are doing is trying to calculate center of lift by measuring the chord of the wing. By only measuring the wingtip itself our calculated CL may be closer to the leading edge than actual CL. This is the least risky way to go. For those wanting to push the limits, it’s possible to calculate the CL closer to actual. For this we want to lay the uninflated kite out flat on the ground. Each strut divides the kite into separate panels. Each panel will have approximately the shape in Drawing 2. Measure X for each panel along the SHORTER leg. Also calculate the area A thusly: A = C x W Do this for each panel until you reach the center strut. If we have 3 panels we have 3 Xs, and 3 As. X1 and A1, X2 and A2, X3 and A3. We calculate our new X with this formula: X =
((A1 x X1) + (A2 x X2) + (A3 x X3))
_______________________________
(A1 + A2 + A3)
This second method should provide a calculated X that is closer to actual. You can now calculate pigtail placement as you did in the first example, using the new X. You might want to consider placing the pigtail somewhat forward of this calculated position. If everything calculated correctly, you’re right on the edge of disaster with no room for error. The distance PT MUST BE NO MORE than 1/3(X). Line PTP indicates the pigtail placement position. The further aft PTP is, the lighter the bar pressure and the more effective the bridle will be. WARNING, if distance PT is greater than 1/3(X) the kite may go out of control at any time. When this happens the rear lines will go slack and you will have ABSOLUTELY no control of the kite. All steering and depower WILL BE LOST!!! You MUST test the kite while the chickenloop is attached to an immovable object before flying it yourself. Remember, mistakes can and will happen. Verify your pigtail placement is safe!!!
When you’re doing your testing, it’s a REALLY good idea to have a fifth line safety….
Pictures to come later! Hope this helps...
Nak
(Edited to correct formula 2)
 |
| Drawing 2 |
Drawing 2.jpg |
 |
| Drawing 1 |
Drawing1.jpg |
Last edited by Nak on Fri Mar 30, 07 10:54 pm; edited 1 time in total |
|
|
TravisBickleRex

Since 30 Jun 2005
341 Posts
Taxi Driver
|
| Fri Mar 30, 07 10:10 pm diagram |
|
|
Diagrams and smart-guy calculations don't explain a whole-lot where I grow'd up...especially on a Friday night.
tongue-my-bag-equals-MC-Hammer-squared can be highly useful. Here's a couple diagrams to ponder;
 |
| |
Ch4control.gif |
 |
| |
Ch4compare-operations.gif |
|
|
|
Nak
Since 19 May 2005
4340 Posts
Camas
Site Lackey
CGKA Member
|
| Sat Mar 31, 07 9:08 am |
|
|
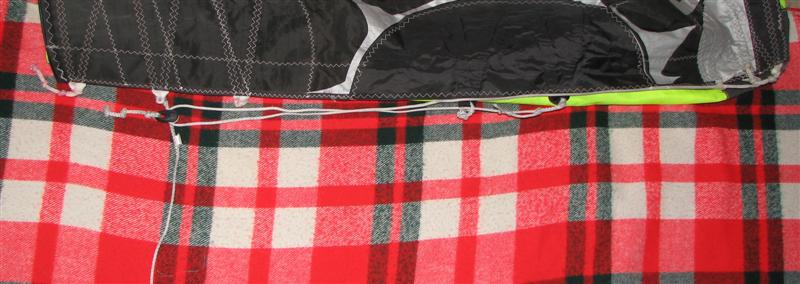
Here are a couple of photos. Picture 1 shows a bridle added to a 19 fuel. Leading edge is to the right. I apologize for the angle. It looks like the pigtail extension on the rear is longer than the bridle, but that's only the angle of the shot. The bridle and the pigtail extension are the same length.
You probably will notice that the rear pigtail is one notch forward of the normal placement. That's because bar pressure was too light on the rear most setting. The kite actually turns faster on this setting as well. Yeah, I know, it's supposed to turn slower on this setting. With this bridle it turns faster. One of these days I'm going to try it on the rear setting with a Bow type control bar. (2 : 1) Bar pressure would still be lower than stock, I think, and it would turn a lot faster... Just a thought.
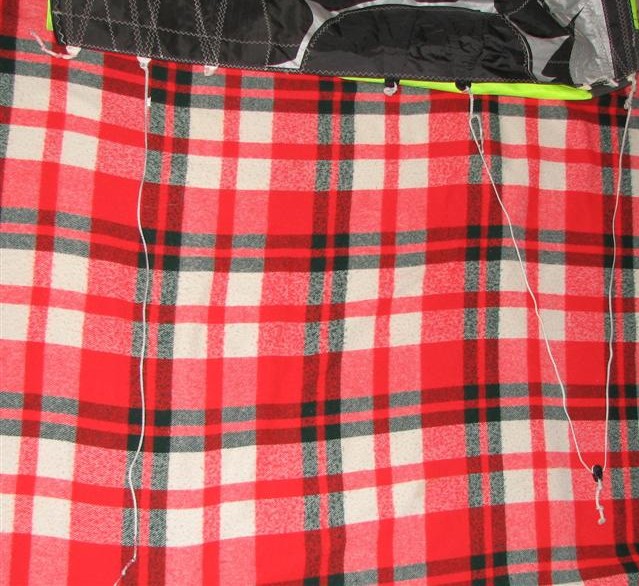
Picture 2 shows how you determine the length of the bridle. Make it short enough that it doesnt reach the trailing edge as shown here. If it is long enough to reach the trailing edge, it could tangle on the end of the strut.
Travis, sorry about the egghead stuff. I really don't know any other way to describe how to do this. I guess you could sew on a shitload of new attachment points, one every inch. Then you could keep moving the bridle's rear point back until the kite goes out of control. That would be a pain in the ass, and could result in a blown leading edge after the inevitable crash. The math really isn't as complicated as it looks. Plug in some numbers, some addition, some multiplication, some division and you're done. The hard part is the testing.
More to come.
Nak
 |
| |
Piicture 2 (Medium).jpg |
 |
| |
Picture 1 (Small).jpg |
|
|
|
Nak
Since 19 May 2005
4340 Posts
Camas
Site Lackey
CGKA Member
|
| Sat Mar 31, 07 9:16 am |
|
|
I really want to emphasize that this IS NOT for everyone. If you like to tinker with stuff you might enjoy it. Ever hot-rodded a car? There is a down side. You could damage your kite pretty bad. Remember, you're a test pilot as soon as you start playing with this. If you don't take suitable precautions, you could hurt or kill yourself.
ALWAYS test the kite while the chickenloop is attached to an immovable object. Make DAMN sure that nobody is downwind. Really test it out in this position. Oversheet the hell out of it. use LOTS of steering input. These are the situations that may cause it to go out of control. Once out of control, it may not look so bad. It may just sit there at zenith, but with slack rear lines. Turning control should be enhanced, not degraded. If you find it doesnt turn well, you may have your rear bridle placement to far aft. DO NOT hook yourself to a modified kite until you KNOW it's safe. If you can't make that determination, DO NOT ATTEMPT THIS!!!!
Nak
|
|
|
endoshred

Since 22 May 2006
232 Posts
HR
Stoked
|
| Sat Mar 31, 07 10:01 am |
|
|
| interesting. are you proposing this for all fuels or just the 04s? this year you see many kites that appear to be c kites but have a bow style bridle system. you see best and slingshot come out with bridle modifications for their waroos and links. do you think this would provide great benefit to any c kite? should the manufacturers consider offering bridles?
|
|
|
Nak
Since 19 May 2005
4340 Posts
Camas
Site Lackey
CGKA Member
|
| Sat Mar 31, 07 10:27 am |
|
|
You get the most benefit on the larger sizes. (Or any C kite that you want to reduce bar pressure on.) One manufacturer has this patented, so you probably won't see it from other companies.
I don't propose this for ANY kite. I like it, but there are cons. (Increased complexity.) I posted how to do this because I received some emails expressing an interest in how to do it. There are risks involved, to both body and property. Anyone choosing to do this does so of there own accord, and therefore must assume all responsibility and liability for doing so.
I really like my 19 Fuel a lot better with this mod. I haven't tried it on a Machine yet, but I plan on it. You can't get the same control effectiveness on a larger kite just by going to a longer control bar. Sheeting control is affected by a larger kite just as is turning control. This bridle addresses those issues, though not completely. You can't make a 19 fly like an 11. But you can make it fly better, at least in my opinion.
If you're happy with the way a particular C kite flys, then I wouldn't screw with it on that kite.
On another note, on some posts, you have to read between the lines. Not that you'd have to do that with any paragraph in this post. Just a general thought. I know we all love the liability laws in this country! 
Nak
|
|
|
|
|
You cannot post new topics in this forum
You cannot reply to topics in this forum
You cannot edit your posts in this forum
You cannot delete your posts in this forum
You cannot vote in polls in this forum
You can attach files in this forum
You can download files in this forum
|
|

